

How to Use a Safety Razor: A Complete Step-by-Step Guide for Beginners
A double-edge safety razor looks intimidating the first time you hold one. A single naked blade, no pivoting head, no lubricating strip, nothing between the edge and your face but your own hand. But that simplicity is exactly why it gives a closer, more comfortable, far cheaper shave than any cartridge, and using one is not hard. It is a small set of rules that feel awkward for a week and then become second nature. Learn them once and you will wonder why you ever paid four dollars a cartridge to shave worse.
This is the complete walkthrough, from putting the blade in to splashing on the aftershave, written for someone holding their first safety razor right now.
What You Need to Start
You can start with very little. A mild, forgiving razor such as the Merkur 34C or the Edwin Jagger DE89 is the ideal first razor, gentle enough to learn on and good enough to keep forever. Add a pack of blades, and because blades are personal, a small sampler is smarter than committing to one brand; the Astra Superior Platinum is a mild, widely loved blade to start from. You will want a brush to build lather, and a simple synthetic like the TWSS Black G5 or a boar brush works perfectly. A soap or cream, such as the beginner-friendly Proraso Green, an alum block for aftercare and feedback, and an aftershave finish round it out. That is the whole kit, and most of it lasts for months or years.
If you would rather have a shop assemble a forgiving starter setup for you, the Rockwell R1 Rookie is a razor built specifically to get a new shaver through the learning curve. And if the hunt appeals to you, a clean vintage Gillette Super Speed is one of the best and cheapest first razors ever made.
Step 1: Load the Blade Safely
Double-edge blades are sharp on both long edges and completely harmless on the two short ends. Handle a blade only by those short ends, or leave it in its paper wrapper until the last second.
How the razor opens depends on the type. A three-piece razor unscrews into a handle, a baseplate, and a top cap; you set the blade on the baseplate over the alignment posts, put the cap on top, and screw the handle back on. A two-piece or a butterfly-open razor has doors that open when you turn the handle; you drop the blade in and twist it closed. Either way, the blade should sit centered and even, with the same sliver of edge showing on both sides. Tighten it snug, not gorilla-tight. Then set it down and wash your hands, because you are now holding something genuinely sharp.
Step 2: Prep Your Face
Prep is half the shave. The goal is warm, soft, hydrated stubble, because soft hair cuts easily and dry hair fights back.
The best time to shave is right after a hot shower, when your face is warm and the hair has had a few minutes to swell and soften. If you are not showering first, splash your face with warm water or hold a hot damp towel against it for a minute. Then build a good lather and paint it over the whole area with your brush, working it in so it gets under the hairs rather than just sitting on top. A proper lather is slick and cushioning, not dry and airy, and it is what lets the blade glide instead of drag. Never take a safety razor to a dry face.
Step 3: Find the Angle
This is the one thing that matters most, and the one beginners get wrong. A cartridge razor holds its own angle for you. A safety razor does not, so you set it.
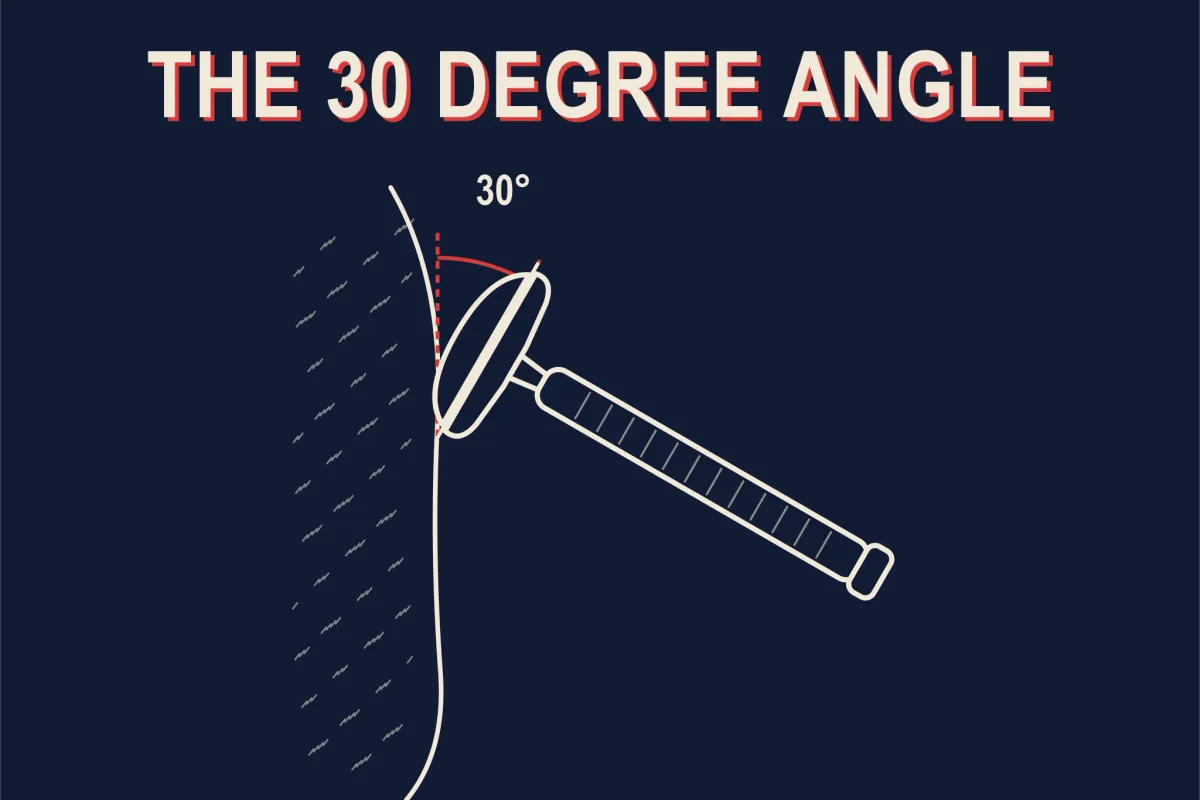
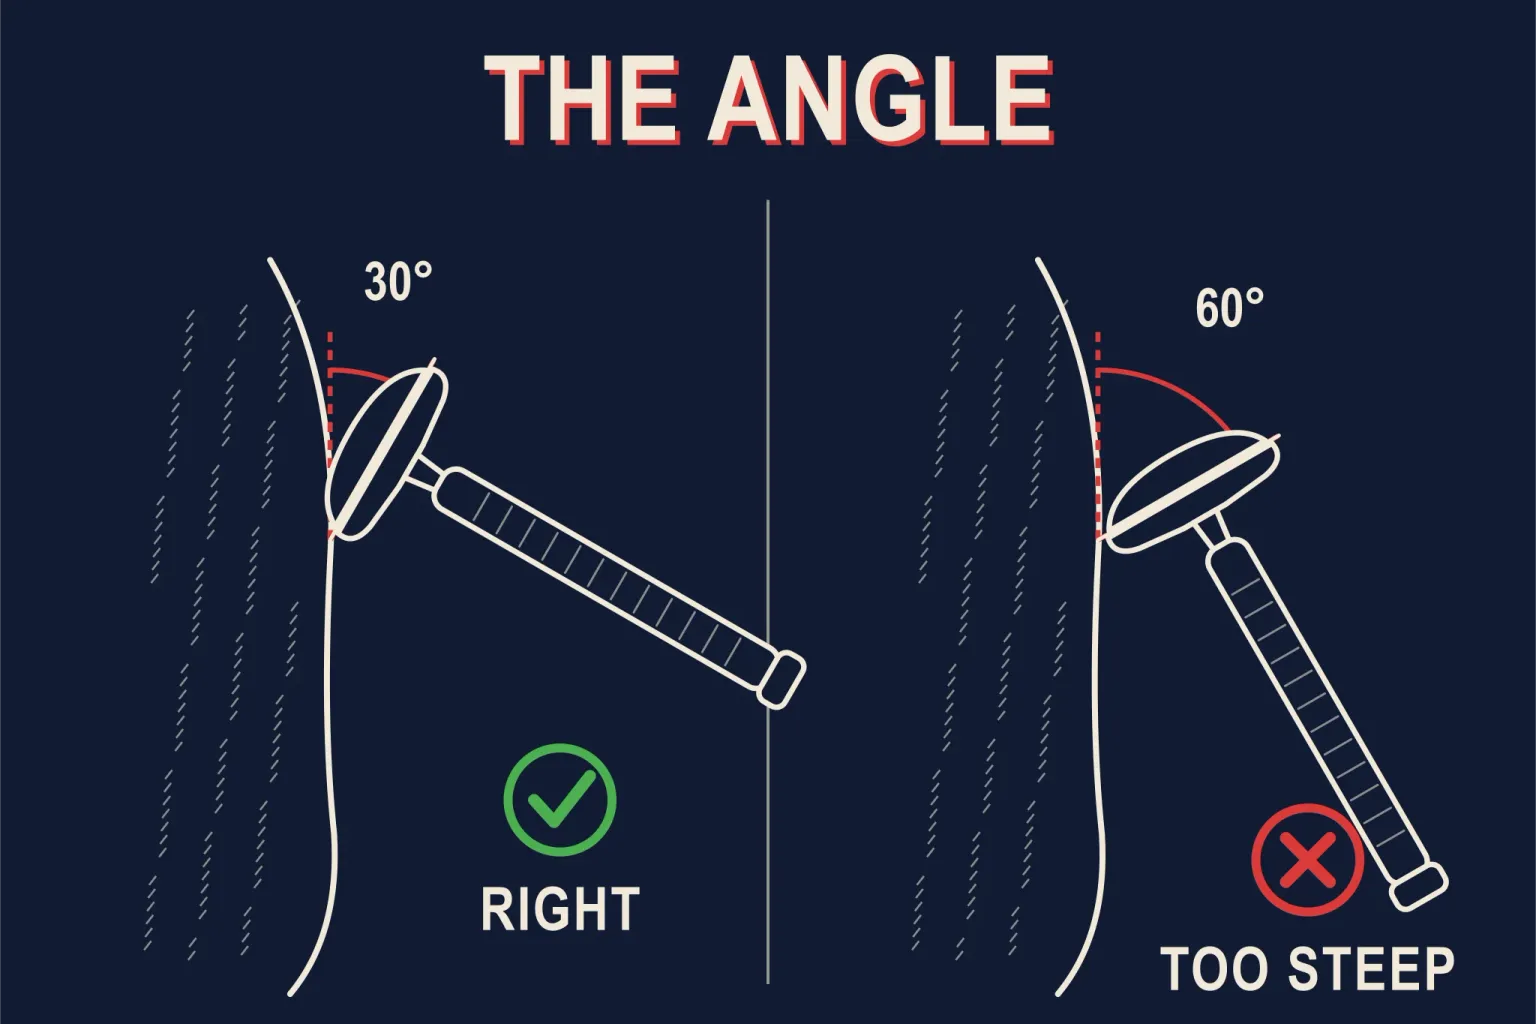
Rest the top cap flat against your cheek so the handle points straight out from your face, then lower the handle toward the floor until the blade just begins to touch the skin. That is roughly a thirty-degree angle between the blade and your face, and it is where the razor cuts cleanly. Too steep, with the handle dropped too far, and the blade scrapes and bites. Too shallow, with the handle too high, and it will not cut at all. You will find the exact spot by feel within a few shaves, listening for the quiet, satisfying sound of the blade actually cutting stubble.
Step 4: Use No Pressure
The second rule that saves beginners: let the weight of the razor do the work and add none of your own. A safety razor is heavy enough to cut with its own mass. The instinct from cartridge shaving is to press the razor into your face, and on a safety razor pressing is exactly what causes nicks, weepers, and razor burn.
Hold the razor with a light grip, guide it across your skin, and let it glide. If it is not cutting, the answer is never more pressure. It is a better angle, a sharper blade, or a wetter lather. Think of yourself as steering the razor, not pushing it.
Step 5: Shave in Short Strokes, With the Grain
Shave in short strokes, an inch or two at a time, and go slowly. Keep the skin taut with your free hand, because a flat, tight surface cuts cleanly while loose skin catches.
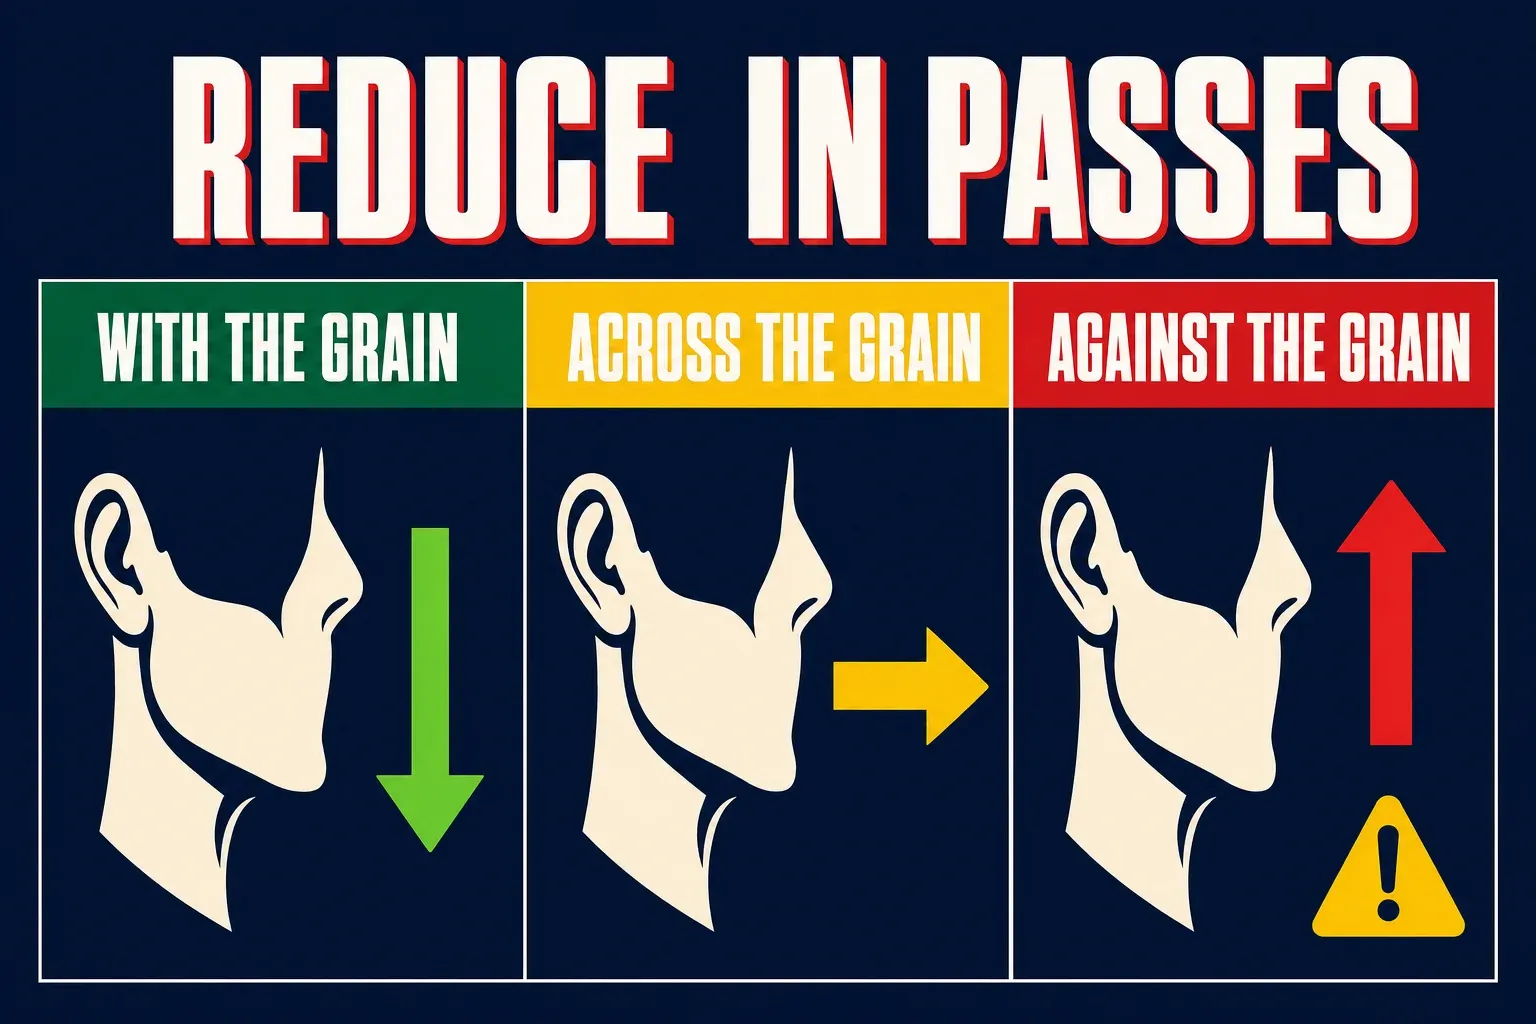
For your first pass, and for your first few weeks, shave only with the grain, meaning in the same direction your hair grows. On most faces that is downward on the cheeks and often upward on the neck, but it varies, so take a day’s growth and rub your fingers across the stubble to feel which direction is smooth. Smooth is with the grain. Shaving with the grain is the most comfortable, most forgiving direction, and it alone will give you a decent shave while you learn. Rinse the blade often as you go so it does not clog.
Step 6: Reduce the Beard in Passes
Here is the mental shift that makes safety razors click: you are not trying to remove all the hair in one stroke. You are reducing it in stages.
After your first with-the-grain pass, re-lather completely and shave again, this time across the grain, moving perpendicular to how the hair grows. This second pass is where most of the closeness comes from, and it is gentler than going straight against the grain. For a great many shavers, with the grain plus across the grain is a comfortable, close shave and the place to stop. Only once your skin is handling two passes without complaint should you try a careful against-the-grain pass for maximum smoothness, and even then, plenty of people never need it. Re-lather before every pass. A dry pass is a painful pass.
Step 7: Rinse, Inspect, and Finish
When you are done, rinse your face with cool water to clear the lather and calm the skin, and run your hand over it to find any patches you missed. Pass a wet alum block over your face if you have one; it gives a light antiseptic tightness and, usefully, tells you where you were too aggressive, since those spots will sting slightly. Then finish with an aftershave, a bracing splash if your skin likes it or a soothing balm if it does not.
Take the blade out, rinse and dry the razor, and stand it up to dry. A blade lasts most shavers about a week of daily shaving; when it starts to tug instead of glide, swap it. Blades cost pennies, so never push a dull one.
The Rules, in One Place
If you remember nothing else, remember these. Prep with a hot, wet face and a slick lather, every time. Find the thirty-degree angle by resting the cap flat and lowering the handle. Use no pressure at all. Shave with the grain first and add other directions only as your skin allows. Shave in short strokes with taut skin. Reduce the beard over multiple passes, re-lathering each time. And do not chase a perfect shave in week one, because the closeness comes as your technique settles, usually within a couple of weeks.
Common Beginner Mistakes
Most first-shave problems come from a short list of fixable habits. Pressing too hard is the big one, and it causes almost all early irritation. Going against the grain too soon is the second, so resist it until you have clean with-the-grain and across-the-grain shaves down. Using a dry or thin lather makes the blade drag, so build it wetter than you think. Chasing baby-smoothness in one aggressive pass instead of reducing over several is a reliable way to shred your neck. And blaming the razor for what is almost always technique sends people buying new gear when two more weeks of practice was the real answer.
The Bottom Line
Using a safety razor comes down to a warm, well-lathered face, a shallow angle you find by feel, zero pressure, short strokes with the grain, and reducing your beard over a couple of gentle passes. That is genuinely the whole skill. It feels clumsy for a week, clicks in the second, and by the end of the first month you will be giving yourself the closest, most comfortable, cheapest shaves of your life with a tool that will outlast every cartridge system on the shelf.
Frequently asked questions
What angle do you hold a safety razor at?
Roughly thirty degrees between the blade and your face. Find it by resting the top cap flat against your cheek with the handle pointing straight out, then lowering the handle until the blade just begins to touch the skin. Too steep and the blade scrapes and bites; too shallow and it will not cut at all.
How much pressure should you use with a safety razor?
None. A safety razor is heavy enough to cut with its own weight, and pressing is what causes nicks, weepers, and razor burn. If it is not cutting, the answer is a better angle, a sharper blade, or a wetter lather, never more pressure.
Should a beginner shave with or against the grain?
With the grain only for the first few weeks, meaning the direction your hair grows. Add an across-the-grain second pass for closeness once that feels comfortable, and only try a careful against-the-grain pass once your skin handles two passes without complaint. Plenty of shavers never need it.
How many passes should a safety razor shave take?
You reduce the beard in stages instead of removing it in one stroke: a with-the-grain pass, then re-lather and go across the grain. For a great many shavers those two passes are a comfortable, close shave and the place to stop. Re-lather before every pass.
How long does a double-edge razor blade last?
About a week of daily shaving for most people. When the blade starts to tug instead of glide, swap it. Blades cost pennies, so never push a dull one.
What do you need to start shaving with a safety razor?
A mild razor such as the Merkur 34C or Edwin Jagger DE89, a small blade sampler, a synthetic or boar brush, a beginner-friendly soap or cream, an alum block, and an aftershave. Most of the kit lasts for months or years.
Happy shaving.